How to Find a Leak in a Hot Tub
A Complete Guide to Detecting and Locating Hot Tub Leaks
Is your hot tub losing water faster than normal? A leak can be frustrating and costly if not addressed quickly. The good news is that with the right approach, you can locate most hot tub leaks yourself. This comprehensive guide will walk you through proven methods to find leaks in your hot tub, from simple visual inspections to advanced detection techniques.
Understanding Hot Tub Leaks
Before diving into detection methods, it's important to understand where leaks commonly occur. Hot tubs have several vulnerable points:
• Shell cracks or damage – From age, freezing, or structural stress
• Plumbing connections – Union fittings, glued joints, and pipe connections
• Jets and fittings – Where jets attach to the shell
• Pump seals – Gaskets and seals around pumps and heaters
• Drain plugs – Often overlooked but common leak sources
Quick Leak Statistics
|
✓ 70% of leaks occur in plumbing connections |
|
✓ Average leak wastes 20-30 gallons per day |
|
✓ Early detection can save $500+ in repairs |
|
✓ Most leaks can be found in under 2 hours |
Step 1: The Bucket Test
Before spending time hunting for a leak, confirm you actually have one. Water loss from evaporation is normal, especially in hot tubs. The bucket test helps you determine if water loss exceeds normal evaporation.
How to Perform the Bucket Test:
1. Fill a bucket with water to about 3 inches from the top
2. Mark the water level on the inside of the bucket with a marker or tape
3. Place the bucket on a hot tub step so it's partially submerged
4. Mark the hot tub's water level at the same time
5. Turn off all pumps, heaters, and jets
6. Wait 24 hours without using the hot tub
7. Compare the water levels in both the bucket and hot tub
|
Reading the Results: |
|
|
Bucket & tub lost equal amounts |
Normal evaporation – no leak |
|
Tub lost more than bucket |
You have a leak |
|
Tub lost significantly more |
Major leak – act quickly |
Step 2: Visual Inspection
Once you've confirmed a leak exists, start with the easiest detection method: looking for obvious signs of water. Many leaks can be spotted with a careful visual inspection.
What to Look For:
|
Area to Check |
Signs of Leaks |
|
Around the Hot Tub |
Wet spots, puddles, damp ground, water stains |
|
Equipment Compartment |
Dripping water, moisture on pumps, wet insulation |
|
Cabinet Panels |
Water damage, warping, mold, discoloration |
|
Under Equipment |
Pooling water, mineral deposits, rust |
|
Deck/Concrete |
Cracks with water seeping, settling or sinking |
Pro Tip
|
Check the equipment area when the pumps are running. Many connection leaks only appear under pressure when the system is operating. |
Step 3: The Dye Test
The dye test is one of the most effective ways to locate shell leaks, cracks, and pinhole leaks that aren't visible to the naked eye. This method works because the colored dye is pulled toward any leak point by water movement.
What You'll Need:
• Food coloring or leak detection dye (dark colors work best)
• Swimming goggles for underwater inspection
• Patience – this takes time and methodical work
How to Perform the Dye Test:
8. Turn off all pumps, jets, and circulation
9. Wait for water to become completely still (10-15 minutes)
10. Start at suspected leak areas or work systematically around the tub
11. Dispense a few drops of dye near the suspected area
12. Watch carefully – if there's a leak, dye will be pulled toward it
13. Mark any leak locations for repair
Where to Test First
|
High Priority |
Jets, light fixtures, drain covers, visible cracks |
|
Medium Priority |
Seams, bench areas, steps, shell corners |
|
Low Priority |
Smooth shell surfaces away from fittings |
Step 4: Checking Plumbing and Equipment
Since 70% of hot tub leaks occur in the plumbing system, this is often where you'll find the culprit. Equipment area leaks are usually easier to fix than shell leaks, making this a good news scenario.
Inspection Checklist:
|
✓ Union Fittings |
Look for moisture around threaded connections where pipes join pumps and heaters |
|
✓ PVC Joints |
Examine glued connections for cracks or separation, especially at elbows |
|
✓ Pump Seals |
Check the wet end seal where the motor connects to the pump housing |
|
✓ Heater Connections |
Inspect both inlet and outlet connections for drips or moisture |
|
✓ Valves |
Test all diverter valves, check valves, and slice valves for leaks |
|
✓ Pressure Switch |
Look at the pressure switch and its connection tubing |
Testing Under Pressure
|
Important: Run the pumps on different speed settings and watch for leaks. Some connections only leak when under pressure. Use a dry paper towel to check suspicious areas – even small amounts of moisture will show up clearly. |
Step 5: Advanced Detection Techniques
If you've tried the basic methods and still can't locate the leak, these advanced techniques can help pinpoint elusive problems.
|
Method |
Description |
Difficulty |
|
Isolation Testing |
Close valves to isolate sections of plumbing, then monitor water level. The section with the leak will show continued water loss. |
Medium |
|
Pressure Testing |
Plug pipes and use air pressure to test individual plumbing runs. Bubbles or pressure drops indicate leaks. |
Advanced |
|
Listening Method |
In quiet conditions, you can sometimes hear water running or hissing at leak points, especially in plumbing. |
Easy |
|
Thermal Imaging |
Professional thermal cameras can detect temperature differences where water is escaping. |
Requires Equipment |
Common Leak Locations Reference
|
Location |
Frequency |
Symptoms |
Repair Difficulty |
|
Jets |
Very Common |
Water loss continues when pump is off, visible moisture around jet face |
Easy to Moderate |
|
Union Connections |
Very Common |
Drips from threaded connections, moisture on threads |
Easy |
|
Pump Seals |
Common |
Water pooling under pump, dripping from motor housing |
Moderate |
|
Shell Cracks |
Less Common |
Visible crack, water loss with pump off, dye test positive |
Moderate to Hard |
|
Slice Valves |
Common |
Leaking handle area, drips when valve is moved |
Easy |
|
Light Housing |
Moderate |
Water in light fixture, moisture around lens |
Moderate |
When to Call a Professional
While many leaks can be found and fixed by hot tub owners, some situations require professional expertise. Here's when to call in the experts:
• You've tried all detection methods and still can't find the leak
• The leak appears to be in the underground plumbing
• Multiple leaks are suspected
• The tub is losing more than 1 inch of water per day
• Structural damage to the shell is suspected
• The repair requires specialized equipment or expertise
Professional Services
|
Leak Detection |
$150 - $300 |
|
Shell Repair |
$200 - $600 |
|
Pump Seal Replacement |
$100 - $250 |
|
Plumbing Repair |
$150 - $400 |
|
Complete Replumbing |
$800 - $2,000+ |
Final Tips for Success
|
✓ Work systematically – don't skip steps in your search ✓ Be patient – some leaks take time to locate ✓ Document everything – take photos and notes as you investigate ✓ Fix leaks promptly – small leaks can become big problems ✓ Maintain your hot tub regularly to prevent future leaks ✓ Keep repair supplies on hand for quick fixes ✓ Don't ignore small leaks – they rarely fix themselves |
Finding a hot tub leak can be challenging, but with these systematic approaches, you'll be able to locate most problems. Remember that early detection and repair will save you money, water, and the enjoyment of your hot tub. Whether you tackle the repair yourself or call a professional, identifying the leak location is the crucial first step to getting your hot tub back to perfect condition.
Custom-Made for a Perfect Fit
Every spa is unique, which is why we don’t believe in "one size fits all." We specialize in custom hot tub covers designed using advanced CAD (Computer-Aided Design) technology. This ensures that every cover is built to your exact dimensions, providing a snug, airtight seal that locks in heat and keeps out debris.
If your current cover is heavy, waterlogged, or cracked, it’s time for a hot tub cover replacement. Our streamlined ordering process makes it easy to upgrade to a handmade, high-performance cover that will restore your spa’s efficiency and aesthetic appeal.

Heavy-Duty Handles
Double-stitched, marine-grade vinyl for maximum durability and a premium look.

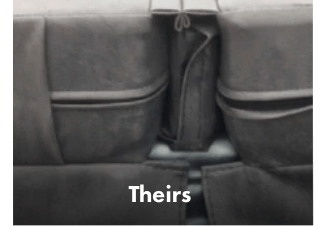
Safety Straps
Reinforced, color-matched straps designed to withstand high winds and heavy use.

Reinforced Stitching
Double-stitched seams and hinges to ensure your cover lasts for years.
Other Guys
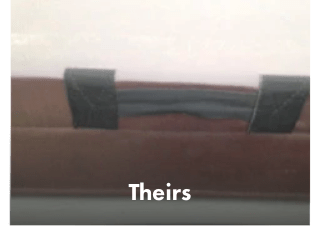
Their cheap handles are more prone to wear and tear and are known to rip off within the first two years plus the appearance speaks for itself.

Our competition uses low-quality straps that are prone to breakage and often times do not match the color of the spa cover.
Their use of single stitching and exposed shells can ultimately cause cracking and heat loss, costing you more on your electric bill.
Why Choose MySpaCover?
We don’t just claim to have the best quality, we prove it through superior materials and craftsmanship. Every cover we produce is "Made in the USA" and built to exceed industry standards, ensuring your investment is protected for years to come.
We’ve found a few great alternatives to your selected spa cover that can reach you even quicker!
Here are the closest available alternatives based on your preferences.