Summer Hot Tub Cover Care: The Ultimate Protection Guide
When temperatures rise, most spa owners worry about heavy snow or winter freezes. However, summer conditions, intense ultraviolet (UV) radiation, high heat, soaring humidity, and accelerated chemical off-gassing can degrade a premium hot tub cover faster than winter weather.
Without targeted preventative maintenance, a quality cover that should last 5 to 7 years can fail in less than two seasons. This guide delivers actionable strategies to protect your spa investment during the hot summer months.
1. The 4 Hidden Summer Threats to Your Spa Cover
Understanding how summer environments target vinyl and foam structures allows you to stop damage before it becomes visible.
|
Threat Factor |
Structural Impact |
Primary Prevention Strategy |
|
UV Radiation |
Breaks vinyl polymer bonds, creating cracks and brittleness. |
Monthly application of a marine-grade UV blocker. |
|
Thermal Expansion |
Dark vinyl temperatures exceed 122°F (50°C), softening the foam core. |
Use a reflective cover cap or light-colored shade sail. |
|
Chemical Off-Gassing |
Acidic chlorine/bromine vapors rot underside seams and seals. |
Vent the cover for 20–30 minutes after water treatment. |
|
Spore Accumulation |
Ambient humidity and pollen bake onto surfaces, breeding deep mold. |
Weekly exterior rinse and bi-weekly underside wash. |
Pro Tip: If you run your spa in "Cool Pool" mode (dropping temperatures to 85°F / 29°C for a refreshing summer dip), do not leave the cover off all day. Open water accelerates chemical and water evaporation in hot air, wasting money and introducing heavy pollen or bugs into your filtration system.
2. Step-by-Step Deep Cleaning Procedure
Consistent cleaning removes abrasive airborne contaminants like tree sap, bird droppings, and pollen before they bake into the vinyl pores.
1.Remove and Position the Cover:Prerequisite.
Take the cover completely off the spa using a lifter. Place it flat on a clean, soft surface such as a tarp, clean lawn, or blanket. Never drag or rest the cover on rough concrete or gravel, which punctures the exterior skin.
2.Initial Grit Rinse:Step 1.
Use a garden hose with a standard spray nozzle to thoroughly wash away loose dirt, dust, and pollen. Never use a pressure washer; the extreme pressure forces liquid water past stitching lines and directly into the foam core.
3.Apply pH-Neutral Cleaner:Step 2.
Scrub the top surface in circular motions using a soft sponge or microfiber cloth with a mild, pH-neutral soap (like diluted Simple Green or dedicated spa cleaners). Avoid household dish detergents, bleach, alcohol, or ammonia, which strip away built-in factory plasticizers.
4.Sanitize the Underside:Step 3.
Flip the cover. Wipe the interior lining with a mixture of 1 part white vinegar to 3 parts water to neutralize chemical vapor scaling. For localized mildew spots, use a highly diluted bleach solution (1 tablespoon of bleach per liter of water) strictly on the affected spot.
5.Dry and Reinstall:Final Step.
Rinse all soap and vinegar configurations off completely. Prop the cover at an angle to allow absolute air drying. Closing a hot tub with a wet underside traps moisture, which instantly triggers sub-surface mildew growth.
3. Advanced UV Defenses and Heat Mitigation
Unprotected vinyl degrades under direct sunlight like skin, turning dry and chalky before cracking. Once cracked, water vapors migrate freely into the interior insulation.
Apply Marine-Grade Conditioners
Every 4 to 6 weeks, apply a non-petroleum, silicone-free conditioner like 303 Aerospace Protectant. Avoid oil- or petroleum-based automotive protectants; they leave a greasy residue that builds extreme surface heat and breaks down vinyl structural threads. Apply the protectant on a cool morning to ensure uniform absorption without streaking.
Create Ambient Shade
If your spa sits in open afternoon sun, a simple shade structure like a gazebo, pergola, or tensioned shade sail reduces surface temperatures by up to 15°F. For maximum durability against intense solar zones, initializing your setup with high-density, climate-tested custom hot tub covers ensures advanced defense from the start.
4. The "Chemical Rot" Trap: Protecting the Underside
A major cause of premature cover failure is chemical burning from the inside out. When you shock your hot tub water or add high levels of sanitizer, a intense chemical reaction occurs, releasing aggressive, acidic vapors.
If you close the cover immediately after shocking, these vapors have nowhere to escape. They attack the underside of the vinyl, bleach the material, rot the structural nylon stitching, and degrade the clear plastic vapor barrier wrapped around the inner foam core.
The Golden Rule: Every time you add chemicals or shock your spa, leave the cover fully open for at least 20 to 30 minutes. This allows harmful gases to safely disperse into the atmosphere, saving the interior seals of your cover.
5. Waterlogging Diagnostics: When to Spot Failure
A waterlogged cover occurs when the protective plastic vapor barrier around the inner foam panels gets punctured or torn. Steam enters the raw foam, causing it to act like a giant sponge.
How to Diagnose a Saturated Core:
-
Extreme Weight Gain: The cover feels twice as heavy as its original weight when lifted.
-
Physical Sagging: The center seam bows downward (creating a "taco" shape), causing rainwater to pool in the middle rather than shedding off the sides.
-
Spongy Texture: Pressing down on the top panel creates a squishing feel or a sloshing sound inside.
-
Spike in Energy Costs: Saturated foam loses its insulating property completely, forcing your spa heater to run continuously to maintain water temperature.
If your foam inserts are entirely saturated or the external vinyl is badly split, structural restoration is impossible. To protect your spa heater and maintain clean water chemistry, plan a clean hot tub cover replacment to restore your system's efficiency.
6. The Master Summer Maintenance Checklist
Keep your spa running cleanly by matching your care routine to this seasonal calendar framework:
Every Use
-
Vent the spa for 5 to 10 minutes post-soak to clear out initial moisture before locking.
-
Fasten all heavy-duty wind locks and security straps to protect against summer storm drafts.
Weekly Routine (15 Minutes)
-
Hose down the top surface to remove loose pollen, dust, and organic debris.
-
Wipe down the center hinge area and rubber gaskets where ants, spiders, and wet pollen congregate.
Monthly Routine (30 Minutes)
-
Execute a deep soap-and-water wash of the exterior and a vinegar rinse of the underside.
-
Apply a uniform coat of marine-grade UV protectant spray.
-
Lubricate cover lifter joints using a specialized silicone spray (avoid WD-40, which strips factory lubricants).
End of Summer Wind-Down
-
Perform a comprehensive structural check of all stitching, zippers, and strap anchors.
-
Deeply condition the vinyl skin to prepare the cover for the lower temperatures and shifting moisture levels of autumn.
Custom-Made for a Perfect Fit
Every spa is unique, which is why we don’t believe in "one size fits all." We specialize in custom hot tub covers designed using advanced CAD (Computer-Aided Design) technology. This ensures that every cover is built to your exact dimensions, providing a snug, airtight seal that locks in heat and keeps out debris.
If your current cover is heavy, waterlogged, or cracked, it’s time for a hot tub cover replacement. Our streamlined ordering process makes it easy to upgrade to a handmade, high-performance cover that will restore your spa’s efficiency and aesthetic appeal.

Heavy-Duty Handles
Double-stitched, marine-grade vinyl for maximum durability and a premium look.

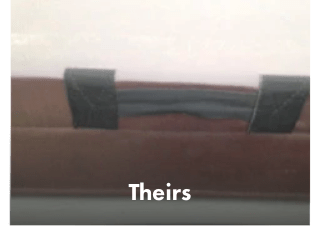
Safety Straps
Reinforced, color-matched straps designed to withstand high winds and heavy use.

Reinforced Stitching
Double-stitched seams and hinges to ensure your cover lasts for years.
Other Guys
Their cheap handles are more prone to wear and tear and are known to rip off within the first two years plus the appearance speaks for itself.

Our competition uses low-quality straps that are prone to breakage and often times do not match the color of the spa cover.
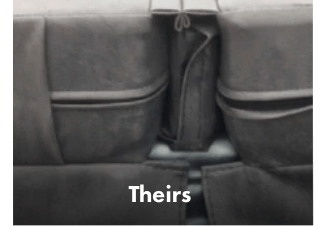
Their use of single stitching and exposed shells can ultimately cause cracking and heat loss, costing you more on your electric bill.
Why Choose MySpaCover?
We don’t just claim to have the best quality, we prove it through superior materials and craftsmanship. Every cover we produce is "Made in the USA" and built to exceed industry standards, ensuring your investment is protected for years to come.
We’ve found a few great alternatives to your selected spa cover that can reach you even quicker!
Here are the closest available alternatives based on your preferences.