The Complete Guide to Cleaning Your Hot Tub Cover
Your hot tub cover is the unsung hero of your backyard oasis. It keeps your water clean, maintains temperature, reduces energy costs, and protects your investment. But like any hardworking piece of equipment, it needs regular care and attention. In this comprehensive guide, we'll walk you through everything you need to know about cleaning and maintaining your hot tub cover to keep it looking great and functioning properly for years to come.
Why Regular Cover Cleaning Matters
Before we dive into the how-to, let's talk about the why. Your hot tub cover faces a constant barrage of challenges: UV rays, rain, snow, leaves, pollen, bird droppings, and even chemicals from the hot tub itself. Over time, this exposure can lead to:
-
Premature wear and tear – Dirt and grime can break down the vinyl, causing cracks and tears
-
Mold and mildew growth – Moisture trapped under debris creates the perfect environment for unwanted growth
-
Fading and discoloration – UV damage and chemical buildup can make your cover look old before its time
-
Reduced insulation – A dirty, degraded cover loses its ability to maintain water temperature effectively
-
Unpleasant odors – Bacteria and mold don't just look bad; they smell bad too
Regular cleaning (every 3-4 months minimum) can prevent these issues and extend your cover's lifespan from 3-5 years to potentially 7-10 years or more. That's a significant return on a small time investment!
What You'll Need: Gathering Your Supplies
The good news is that cleaning your hot tub cover doesn't require expensive or specialized equipment. Here's what you'll need:
Mild dish soap or hot tub cover cleaner
Soft-bristle brush or non-abrasive sponge
Garden hose with spray nozzle
Two clean, dry towels
Bucket for mixing solution
Vinyl conditioner or UV protectant
What NOT to Use
Avoid harsh chemicals like bleach, alcohol-based cleaners, abrasive scrubbers, pressure washers on high settings, or any products containing petroleum distillates. These can damage the vinyl, strip protective coatings, and significantly shorten your cover's lifespan.
The Step-by-Step Cleaning Process
1 Remove and Position Your Cover
Carefully remove the hot tub cover from your spa. This is easier with two people, especially for larger covers. Place it on a clean, flat surface like a driveway, patio, or lawn. Make sure you have access to both the top and bottom surfaces. If placing it on grass, consider laying down a tarp first to prevent grass stains.
2 Rinse Away Loose Debris
Using your garden hose with a spray nozzle, rinse the entire cover thoroughly. Start from the top center and work your way out and down. This removes loose dirt, leaves, pollen, and other debris. Don't forget to rinse the underside as well – this is where moisture and chemicals can accumulate.
Pro Tip
Use a moderate spray setting on your hose. Too much pressure can force water into the cover's seams or damage the vinyl, while too little won't effectively remove debris.
3 Prepare Your Cleaning Solution
In your bucket, mix a small amount of mild dish soap with warm water. You don't need much – a tablespoon or two per gallon is plenty. If using a specialized hot tub cover cleaner, follow the manufacturer's instructions for dilution. The solution should be sudsy but not overly concentrated.
4 Scrub the Surface
Dip your soft brush or sponge into the cleaning solution and begin scrubbing the cover using gentle circular motions. Work in sections, cleaning about 2-3 square feet at a time. Pay special attention to:
-
Areas with visible stains or discoloration
-
The seams and stitching where dirt accumulates
-
Around the handles and tie-down straps
-
Any moldy or mildewed spots (these may need extra attention)
For stubborn stains, let the cleaning solution sit for 5-10 minutes before scrubbing. Avoid excessive pressure – you're cleaning, not sanding!
5 Clean the Underside
Flip the cover over and repeat the cleaning process on the underside. This surface is just as important as the top, as it's in constant contact with steam and chemicals from your hot tub. The underside is particularly prone to mildew, so be thorough.
6 Rinse Thoroughly
This step is crucial. Rinse the cover completely with clean water, ensuring all soap residue is removed. Soap left on the vinyl can actually attract dirt and may degrade the material over time. Keep rinsing until the water runs clear and you see no more suds. Rinse both sides thoroughly.
7 Dry the Cover
Use clean, dry towels to wipe down the cover and remove as much water as possible. Then, prop the cover open or lean it against something to air dry completely. If possible, let it dry in a shaded area – direct sunlight can cause water spots and accelerate UV damage while the cover is wet.
Never Skip Drying!
Putting a wet cover back on your hot tub is a recipe for mold and mildew growth. Always ensure the cover is completely dry, inside and out, before replacing it. This may take 2-4 hours depending on weather conditions.
8 Apply Conditioner and Protectant
Once the cover is completely dry, apply a vinyl conditioner or UV protectant spray. These products help:
-
Restore flexibility to the vinyl
-
Create a protective barrier against UV rays
-
Prevent cracking and fading
-
Make future cleaning easier by creating a smoother surface
-
Repel water and prevent absorption
Apply the product according to the manufacturer's instructions, typically spraying it on and wiping it evenly across the surface with a clean cloth. Don't over-apply – a thin, even coat is all you need.
Need a cover replacement? Browse our spa covers collection
Special Situations: Tackling Tough Problems
Dealing with Mold and Mildew
If you notice black, green, or white spots on your cover, you're dealing with mold or mildew. Mix a solution of 1 part white vinegar to 3 parts water and apply it to the affected areas. Let it sit for 10-15 minutes, then scrub gently and rinse thoroughly. For persistent mold, you may need to repeat this process or use a specialized mold remover designed for vinyl.
Removing Stubborn Stains
Tree sap, bird droppings, and other stubborn stains require special attention. Try these methods:
-
Tree sap: Apply a small amount of rubbing alcohol to a cloth (not directly to the cover) and gently dab the sap until it dissolves
-
Bird droppings: Let them dry, then gently scrape off with a plastic scraper before cleaning normally
-
Rust stains: Use a paste of baking soda and water, apply gently, and rinse thoroughly
Water-Logged Covers
If your cover feels unusually heavy, water may have seeped into the foam core. This is a serious problem that usually means the cover needs replacement. However, you can try standing it on its side in a warm, dry area for several days to see if any water drains out. If the cover doesn't improve, it's time to invest in a new one.
Maintenance Tips Between Deep Cleans
Don't wait for your quarterly deep clean to care for your cover. Here are some things you should do regularly:
Weekly: Quick Rinse
Spray off leaves, debris, and dirt with your garden hose. Takes just 2-3 minutes!
After Snow: Clear Immediately
Remove snow with a soft broom. Heavy snow can damage your cover's structure.
Monthly: Inspect
Check for tears, loose stitching, or worn areas. Early detection prevents bigger problems.
Bi-Monthly: Light Clean
Do a quick soap and water cleaning of high-traffic areas and visible spots.
Common Mistakes to Avoid
-
Using harsh chemicals: Bleach, ammonia, and petroleum-based products will damage your cover irreparably
-
Pressure washing on high: While tempting, high-pressure water can tear vinyl and force water into the foam core
-
Leaving water to pool: Always brush or squeegee standing water off your cover to prevent sagging and water absorption
-
Skipping the underside: The bottom of your cover needs just as much attention as the top
-
Cleaning in direct sunlight: This causes cleaning products to dry too quickly, leaving streaks and residue
-
Forgetting to condition: Cleaning without conditioning is like washing your hands without lotion – it dries out the material
When to Replace Your Cover
Even with excellent care, hot tub covers don't last forever. Watch for these signs that it's time for a replacement:
-
The cover is waterlogged and extremely heavy
-
Large cracks or tears in the vinyl
-
Broken or missing hardware that can't be easily replaced
-
Significant sagging or loss of shape
-
The cover no longer maintains water temperature effectively
-
Persistent mold or mildew that returns despite repeated cleaning
-
The foam core is brittle or crumbling
A typical well-maintained cover lasts 5-7 years, but exceptional care can extend this to 10 years or more.
Invest 30 Minutes, Save Hundreds of Dollars
Regular cleaning is the simplest way to protect your investment and ensure years of relaxing hot tub enjoyment. Set a reminder for every 3 months, and your cover will thank you!
Final Thoughts
Cleaning your hot tub cover might not be the most glamorous task, but it's one of the most important maintenance activities you can do. Think of it this way: you wouldn't skip washing your car or cleaning your home, and your hot tub cover deserves the same attention. Those 30-60 minutes of cleaning every few months can save you hundreds of dollars in premature replacement costs and keep your backyard retreat looking inviting.
Remember, a clean cover is a happy cover – and a happy cover means a cleaner hot tub, lower energy bills, and more enjoyable soak sessions. So grab your supplies, choose a nice day, and show your hot tub cover some love. Your future self (and your wallet) will thank you!
Custom-Made for a Perfect Fit
Every spa is unique, which is why we don’t believe in "one size fits all." We specialize in custom hot tub covers designed using advanced CAD (Computer-Aided Design) technology. This ensures that every cover is built to your exact dimensions, providing a snug, airtight seal that locks in heat and keeps out debris.
If your current cover is heavy, waterlogged, or cracked, it’s time for a hot tub cover replacement. Our streamlined ordering process makes it easy to upgrade to a handmade, high-performance cover that will restore your spa’s efficiency and aesthetic appeal.

Heavy-Duty Handles
Double-stitched, marine-grade vinyl for maximum durability and a premium look.

Safety Straps
Reinforced, color-matched straps designed to withstand high winds and heavy use.

Reinforced Stitching
Double-stitched seams and hinges to ensure your cover lasts for years.
Other Guys
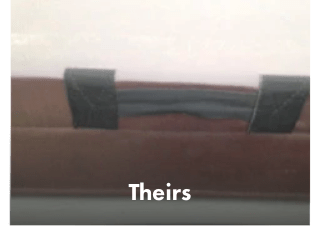
Their cheap handles are more prone to wear and tear and are known to rip off within the first two years plus the appearance speaks for itself.

Our competition uses low-quality straps that are prone to breakage and often times do not match the color of the spa cover.

Their use of single stitching and exposed shells can ultimately cause cracking and heat loss, costing you more on your electric bill.
Why Choose MySpaCover?
We don’t just claim to have the best quality, we prove it through superior materials and craftsmanship. Every cover we produce is "Made in the USA" and built to exceed industry standards, ensuring your investment is protected for years to come.
We’ve found a few great alternatives to your selected spa cover that can reach you even quicker!
Here are the closest available alternatives based on your preferences.